Playwright in GitHub Actions: The Complete Guide to CI Testing
Set up Playwright in GitHub Actions the right way. This guide covers workflows, sharding, caching, reports, and fixing common CI failures.

Running Playwright in GitHub Actions is one of the fastest ways to catch bugs before they reach production. Every push, every pull request, and every merge gets validated automatically, and you do not need to manage a single server to make it happen.
According to the JetBrains 2025 Developer Ecosystem Survey, GitHub Actions holds roughly 62% adoption among personal projects. It leads organizational CI/CD usage at around 33 to 41%.
The problem is that setting up browser tests inside a CI runner is not the same as running them locally. There are missing system libraries, headless browsers that behave differently, and reports that vanish after the job finishes.
This guide walks through every step of configuring Playwright in GitHub Actions, from a basic workflow file all the way to sharding, caching, report uploading, and handling secrets. By the end, you will have a pipeline that runs Playwright test automation reliably on every commit.
What is Playwright and why does it pair well with GitHub Actions?
Playwright controls Chromium, Firefox, and WebKit through a single API. It runs those browsers in headless mode by default, which is exactly what makes it a natural fit for CI environments.
GitHub Actions is a CI/CD platform built directly into GitHub. You define workflow files in YAML, store them inside your repository, and GitHub spins up a fresh virtual machine every time a trigger fires. No external server to manage, no third-party service to configure.
Here is why Playwright in GitHub Actions works so well together:
-
Zero infrastructure overhead. GitHub-hosted runners come pre-loaded with Node.js, and Playwright's CLI installs its own browser binaries. You do not need Docker unless you want pixel-perfect consistency for visual testing.
-
Native artifact support. The actions/upload-artifact step lets you save HTML reports, screenshots, videos, and Playwright trace viewer files. Failed test artifacts stay available for 30 days by default. Matrix and sharding support. GitHub Action's strategy.matrixmaps directly onto Playwright's --shard flag, so splitting a 500-test suite across 5 parallel jobs takes about 10 lines of YAML.
-
Free for public repos. Public repositories get unlimited GitHub Actions minutes, which makes open-source projects a perfect use case.

Prerequisites before you start
Before writing any YAML, make sure the following are in place.
Local environment:
- Node.js 18 or later installed (LTS recommended)
- A working Playwright project with at least one test file
- @playwright/test added to your package.json dev dependencies
GitHub repository:
- Your project code pushed to GitHub
- Write access to create files inside .github/workflows/
- Familiarity with basic Git commands (push, pull request, branching)
If you are starting from scratch, run this command to scaffold a new Playwright project:
npm init playwright@latestThe CLI will ask whether you want TypeScript or JavaScript, which browsers to install, and whether to add a GitHub Actions workflow. Say yes to the workflow option. It generates a ready-to-use YAML file at .github/workflows/playwright.yml.
If you already have a project and just need the workflow file, the next section walks through building one from scratch.
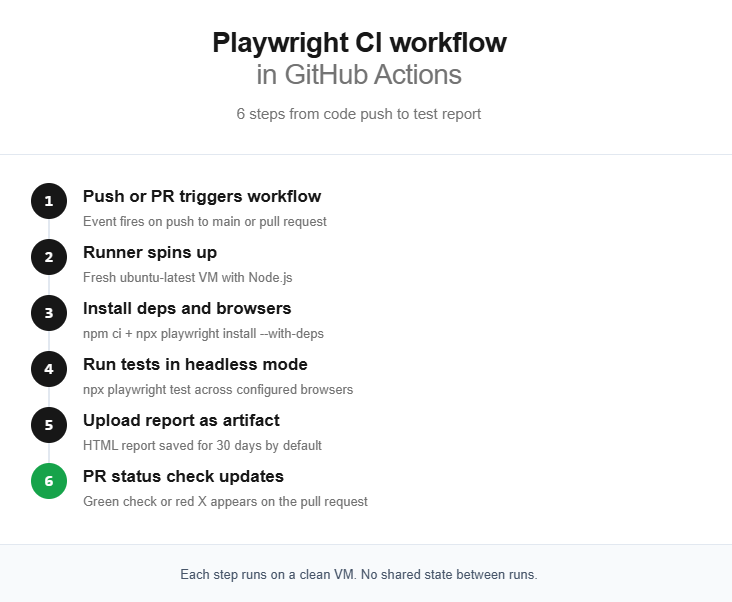
How to set up a basic Playwright GitHub Actions workflow
The workflow file lives at .github/workflows/playwright.yml. Here is the complete file, followed by a line-by-line explanation.
name: Playwright Tests
on:
  push:
    branches: [ main, master ]
  pull_request:
    branches: [ main, master ]
jobs:
  test:
    timeout-minutes: 60
    runs-on: ubuntu-latest
    steps:
    - uses: actions/checkout@v4
    - uses: actions/setup-node@v4
      with:
        node-version: lts/*
    - name: Install dependencies
      run: npm ci
    - name: Install Playwright Browsers
      run: npx playwright install --with-deps
    - name: Run Playwright tests
      run: npx playwright test
    - uses: actions/upload-artifact@v4
      if: ${{ !cancelled() }}
      with:
        name: playwright-report
        path: playwright-report/
        retention-days: 30
Breaking down each section
Triggers (on block): The workflow fires on two events. A push to main or master, and a pull_request targeting those branches. This means every PR gets tested before merge.
Runner (runs-on): ubuntu-latest is the recommended runner. It is the cheapest in terms of billable minutes, boots the fastest, and has the best compatibility with Playwright's Linux browser binaries.
Checkout and Node setup: actions/checkout@v4 pulls your repo code into the runner. actions/setup-node@v4 installs the Node.js version you specify. Using lts/* ensures you always get the latest long-term support release.
Dependency installation: npm ci does a clean install from package-lock.json. It is faster than npm install and guarantees reproducible builds in CI.
Browser installation: npx playwright install --with-deps downloads browser binaries and installs OS-level system dependencies like font libraries and media codecs. The --with-deps flag is essential on CI runners because they do not ship those system packages.
Test execution: npx playwright test runs your entire test suite using the configuration in playwright.config.ts.
Report upload: The if: ${{ !cancelled() }} condition ensures the report uploads even when tests fail. Without it, a failed test step skips the upload, and you lose the very report you need to debug the failure.
Running tests across multiple browsers with matrix strategy
One of Playwright's strengths is native multi-browser support. By default, playwright.config.ts defines projects for Chromium, Firefox, and WebKit. But in CI, running all three sequentially on a single runner triples your pipeline time.
The matrix strategy fixes this by spinning up separate runner instances for each browser, running them in parallel.
# .github/workflows/playwright.yml
name: Playwright Tests
on:
  push:
    branches: [ main, master ]
  pull_request:
    branches: [ main, master ]
jobs:
  test:
    timeout-minutes: 60
    runs-on: ubuntu-latest
    strategy:
      fail-fast: false
      matrix:
        project: [chromium, firefox, webkit]
    steps:
    - uses: actions/checkout@v4
    - uses: actions/setup-node@v4
      with:
        node-version: lts/*
    - name: Install dependencies
      run: npm ci
    - name: Install Playwright Browsers
      run: npx playwright install --with-deps
    - name: Run Playwright tests
      run: npx playwright test --project=${{ matrix.project }}
    - uses: actions/upload-artifact@v4
      if: ${{ !cancelled() }}
      with:
        name: playwright-report-${{ matrix.project }}
        path: playwright-report/
        retention-days: 30
Key changes from the basic workflow
- strategy.matrix.project defines three values. GitHub Actions creates one job per value, all running simultaneously.
- fail-fast: false prevents GitHub from cancelling remaining jobs when one fails. You want full results from all browsers, not partial data.
- --project=${{ matrix.project }} tells Playwright to run only the matching project from your config file.
- Artifact names now include the browser name (playwright-report-chromium, etc.) so they do not overwrite each other.
This approach works well for suites under 100 tests. If each browser job still takes too long, you need sharding on top of the matrix.
For a deeper look at parallel execution strategies and how workers interact with CI runner CPU cores, check the Playwright best practices guide.
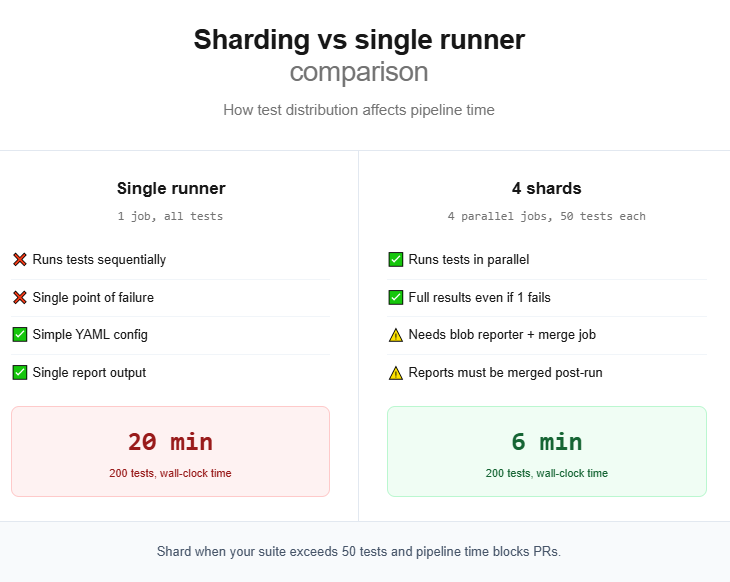
Sharding Playwright tests for faster pipelines

Tip: Start without sharding. Increase workers and enable fullyParallel: true first. Only shard when a single runner cannot finish your suite within your PR review SLA (usually 10 to 15 minutes).
Sharding splits your test suite across multiple CI machines. Each machine runs a fraction of the total tests, and because they run in parallel, total wall-clock time drops dramatically.
When to shard
Sharding introduces complexity (merging reports, managing more CI jobs), so do not reach for it prematurely. Here is a quick decision framework:
-
Under 50 tests: Probably not worth sharding. Optimize Playwright workers first.
-
50 to 200 tests: Sharding into 2 to 4 jobs usually gives the best return.
-
200+ tests: Shard aggressively. 4 to 8 shards are common.
The sharding workflow
This workflow uses 4 shards and a final merge job.
name: Playwright Tests (Sharded)
on:
  push:
    branches: [ main, master ]
  pull_request:
    branches: [ main, master ]
jobs:
  test:
    timeout-minutes: 60
    runs-on: ubuntu-latest
    strategy:
      fail-fast: false
      matrix:
        shardIndex: [1, 2, 3, 4]
        shardTotal: [4]
    steps:
    - uses: actions/checkout@v4
    - uses: actions/setup-node@v4
      with:
        node-version: lts/*
    - name: Install dependencies
      run: npm ci
    - name: Install Playwright Browsers
      run: npx playwright install --with-deps
    - name: Run Playwright tests
      run: npx playwright test --shard=${{ matrix.shardIndex }}/${{ matrix.shardTotal }}
    - name: Upload blob report
      uses: actions/upload-artifact@v4
      if: ${{ !cancelled() }}
      with:
        name: blob-report-${{ matrix.shardIndex }}
        path: blob-report/
        retention-days: 1
  merge-reports:
    if: ${{ !cancelled() }}
    needs: test
    runs-on: ubuntu-latest
    steps:
    - uses: actions/checkout@v4
    - uses: actions/setup-node@v4
      with:
        node-version: lts/*
    - name: Install dependencies
      run: npm ci
    - name: Download blob reports
      uses: actions/download-artifact@v4
      with:
        path: all-blob-reports
        pattern: blob-report-*
        merge-multiple: true
    - name: Merge reports
      run: npx playwright merge-reports --reporter html ./all-blob-reports
    - name: Upload merged report
      uses: actions/upload-artifact@v4
      with:
        name: playwright-report
        path: playwright-report/
        retention-days: 30
Configuring the blob reporter
For sharding to produce a mergeable report, update your playwright.config.ts:
import { defineConfig } from '@playwright/test';
export default defineConfig({
  reporter: process.env.CI ? 'blob' : 'html',
  // ... rest of your config
});
The blob reporter produces a binary format optimized for merging. The final merge-reports job downloads all blob files, combines them, and generates a single HTML report.
Caching Playwright browsers to speed up CI
Every time a workflow runs, npx playwright install --with-deps downloads roughly 300 to 500 MB of browser binaries. On a clean runner, this step alone takes 30 to 90 seconds. Caching eliminates that download on repeat runs.
Adding the cache step
    steps:
    - uses: actions/checkout@v4
    - uses: actions/setup-node@v4
      with:
        node-version: lts/*
    - name: Install dependencies
      run: npm ci
    - name: Cache Playwright browsers
      uses: actions/cache@v4
      id: playwright-cache
      with:
        path: ~/.cache/ms-playwright
        key: playwright-${{ runner.os }}-${{ hashFiles('**/package-lock.json') }}
    - name: Install Playwright Browsers
      if: steps.playwright-cache.outputs.cache-hit != 'true'
      run: npx playwright install --with-deps
    - name: Install system dependencies only
      if: steps.playwright-cache.outputs.cache-hit == 'true'
      run: npx playwright install-deps
    - name: Run Playwright tests
      run: npx playwright test
How this works
-
Cache key is based on
package-lock.json. When you upgrade Playwright, the hash changes and the old cache gets invalidated automatically. -
Conditional install: If the cache hits, browsers are already at
~/.cache/ms-playwright. Only OS-level system dependencies need installing viainstall-deps. -
Savings: On a cache hit, you skip the browser download entirely. This typically saves 30 to 60 seconds per run.
Alternative: Playwright Docker container
If you want the most consistent environment (especially for visual regression tests), skip caching entirely and use the official Playwright Docker image:
jobs:
  test:
    runs-on: ubuntu-latest
    container:
      image: mcr.microsoft.com/playwright:v1.52.0-noble
    steps:
    - uses: actions/checkout@v4
    - name: Install dependencies
      run: npm ci
    - name: Run tests
      run: npx playwright test
No playwright install, no caching logic. The Docker image ships with all browsers and system dependencies pre-installed. The tradeoff is a larger image pull on the first run, but Docker layer caching on GitHub-hosted runners handles this well.
This approach is especially useful when running headless vs headed browser configurations and needing consistent rendering across runs.
Handling environment variables and secrets
Real-world test suites often need credentials, API keys, or URLs that change per environment. Hardcoding these in your test files is a security risk and makes environment switching painful.
Storing secrets in GitHub
- Go to your repository on GitHub
- Navigate to Settings > Secrets and variables > Actions
- Click New repository secret
- Add your secret (for example, STAGING_URL or AUTH_TOKEN)
Passing secrets to the workflow
    - name: Run Playwright tests
      run: npx playwright test
      env:
        BASE_URL: ${{ secrets.STAGING_URL }}
        AUTH_TOKEN: ${{ secrets.AUTH_TOKEN }}
        CI: true
Accessing variables in tests
import { test, expect } from '@playwright/test';

test('login with environment credentials', async ({ page }) => {

  const baseUrl = process.env.BASE_URL || 'http://localhost:3000';

  await page.goto(baseUrl);

  // Use process.env.AUTH_TOKEN as needed

});
You can also reference BASE_URL directly in playwright.config.ts via the use.baseURL property. This keeps your test files clean and lets the workflow control the target environment.
For teams managing Playwright authentication across multiple environments, a common pattern is to save the authenticated browser state to a JSON file using storageState. Reusing that state across all tests eliminates repeated login flows and speeds up the entire suite.
Uploading and viewing test reports
Reporting is one of the most overlooked parts of running Playwright in GitHub Actions. The built-in HTML reporter is the simplest way to debug failed CI runs, but there are better ways to handle reports at scale.
The basic approach: artifact download
The workflow examples above already include actions/upload-artifact. After a run completes (or fails), you can:
- Go to the workflow run in GitHub Actions
- Scroll to the "Artifacts" section at the bottom
- Download playwright-report
- Extract the zip
- Run npx playwright show-report ./playwright-report locally to view it
This works, but it is manual. Every failed build means downloading a zip, extracting it, and running a local server.
Scaling reports with test reporting tools
For teams running hundreds of tests across multiple shards and branches, downloading artifacts is not sustainable. This is where test automation reporting platforms become essential.
Tools like TestDino integrate directly with your CI pipeline. Instead of downloading zips, you get a dashboard that shows:
- Pass/fail trends across branches and commits
- Flaky test detection with automatic pattern recognition
- Screenshots, videos, and trace files viewable in the browser
- Historical run comparisons to catch regressions early
The Playwright reporting ecosystem also includes other reporters like list, json, junit, and the blob reporter used in sharding. You can stack multiple reporters in your config:
export default defineConfig({
  reporter: [
    ['html', { open: 'never' }],
    ['json', { outputFile: 'test-results.json' }],
    ['junit', { outputFile: 'junit-results.xml' }],
  ],
});
JUnit output is particularly useful for teams that use GitHub Actions' built-in test summary integration or third-party dashboards that consume JUnit XML.
Common issues and how to fix them
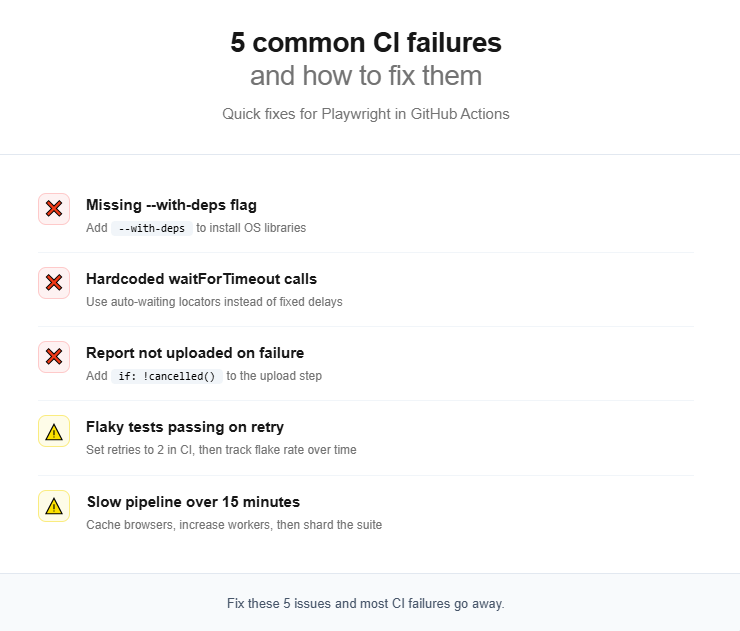
Note: Most CI failures stem from environment differences, not code bugs. The runner is a stripped-down VM with 2 vCPUs and 7 GB RAM. Always test your workflow on a fresh clone before blaming flaky tests.
Even with a correct Playwright in GitHub Actions workflow, certain problems surface repeatedly. In practice, most teams encounter the same handful of issues during their first few weeks of CI adoption.
Tests pass locally but fail in CI
This is the single most common complaint. The root cause is usually one of these:
-
Missing system dependencies. If you forgot
--with-deps, browser binaries cannot find the shared libraries they need. The error often looks likebrowserType.launch: Executable doesn't exist. -
Timing issues. CI runners have fewer CPU cores (typically 2 vCPUs) and less memory than your development machine. Tests that barely pass locally may time out in CI. Use Playwright's built-in auto-waiting instead of hardcoded
page.waitForTimeout()calls. This is one of the key Playwright mistakes to avoid. -
Headless rendering differences. Some CSS or font rendering behaves slightly differently in headless mode. For screenshot comparisons, run tests inside a Docker container for pixel-perfect consistency.
Flaky tests that pass on retry
Flaky tests undermine confidence in the entire pipeline. Playwright has a built-in retry mechanism:
export default defineConfig({
  retries: process.env.CI ? 2 : 0,
});
This retries failed tests up to 2 times in CI but runs them once locally. Playwright marks tests that fail then pass on retry as "flaky" in the report.
Retries are a band-aid, not a fix. Track your flaky test rate over time. Industry benchmarks from the flaky test benchmark report show that teams with more than 15% flaky tests spend 2x more engineering hours on test maintenance.
Slow pipeline execution
If your pipeline exceeds 15 minutes, try these optimizations in order:
- Cache browser binaries (covered in the caching section above)
- Increase workers in playwright.config.ts. The default is half the CPU cores. On a 2-vCPU runner, that is 1 worker. Set it to 2 or 3.
- Enable fullyParallel: true to let Playwright distribute individual tests (not just files) across workers
- Shard the suite across multiple CI jobs
- Remove unnecessary browsers. If you only need Chromium for CI, do not install Firefox and WebKit. Use npx playwright install chromium --with-deps instead.
For a deep dive into execution speed, the guide on slow Playwright tests covers profiling techniques and config changes that can cut run time significantly.
Complete reference workflow with all optimizations
Here is a production-ready Playwright in GitHub Actions workflow that combines caching, sharding, environment variables, retries, and report merging.
name: E2E Tests
on:
  push:
    branches: [ main ]
  pull_request:
    branches: [ main ]
env:
  CI: true
jobs:
  test:
    timeout-minutes: 30
    runs-on: ubuntu-latest
    strategy:
      fail-fast: false
      matrix:
        shardIndex: [1, 2, 3, 4]
        shardTotal: [4]
    steps:
    - uses: actions/checkout@v4
    - uses: actions/setup-node@v4
      with:
        node-version: lts/*
    - name: Install dependencies
      run: npm ci
    - name: Cache Playwright browsers
      uses: actions/cache@v4
      id: playwright-cache
      with:
        path: ~/.cache/ms-playwright
        key: playwright-${{ runner.os }}-${{ hashFiles('**/package-lock.json') }}
    - name: Install Playwright Browsers
      if: steps.playwright-cache.outputs.cache-hit != 'true'
      run: npx playwright install --with-deps
    - name: Install system dependencies only
      if: steps.playwright-cache.outputs.cache-hit == 'true'
      run: npx playwright install-deps
    - name: Run Playwright tests
      run: npx playwright test --shard=${{ matrix.shardIndex }}/${{ matrix.shardTotal }}
      env:
        BASE_URL: ${{ secrets.STAGING_URL }}
    - name: Upload blob report
      uses: actions/upload-artifact@v4
      if: ${{ !cancelled() }}
      with:
        name: blob-report-${{ matrix.shardIndex }}
        path: blob-report/
        retention-days: 1
  merge-reports:
    if: ${{ !cancelled() }}
    needs: test
    runs-on: ubuntu-latest
    steps:
    - uses: actions/checkout@v4
    - uses: actions/setup-node@v4
      with:
        node-version: lts/*
    - name: Install dependencies
      run: npm ci
    - name: Download all blob reports
      uses: actions/download-artifact@v4
      with:
        path: all-blob-reports
        pattern: blob-report-*
        merge-multiple: true
    - name: Merge into HTML report
      run: npx playwright merge-reports --reporter html ./all-blob-reports
    - name: Upload final report
      uses: actions/upload-artifact@v4
      with:
        name: playwright-report
        path: playwright-report/
        retention-days: 30
And the matching playwright.config.ts:
import { defineConfig, devices } from '@playwright/test';
export default defineConfig({
  testDir: './tests',
  fullyParallel: true,
  forbidOnly: !!process.env.CI,
  retries: process.env.CI ? 2 : 0,
  workers: process.env.CI ? 2 : undefined,
  reporter: process.env.CI ? 'blob' : 'html',
  use: {
    baseURL: process.env.BASE_URL || 'http://localhost:3000',
    trace: 'on-first-retry',
    screenshot: 'only-on-failure',
    video: 'retain-on-failure',
  },
  projects: [
    {
      name: 'chromium',
      use: { ...devices['Desktop Chrome'] },
    },
    {
      name: 'firefox',
      use: { ...devices['Desktop Firefox'] },
    },
    {
      name: 'webkit',
      use: { ...devices['Desktop Safari'] },
    },
  ],
});
What each config option does
| Config option | Purpose |
|---|---|
| fullyParallel: true | Distributes individual tests across workers and shards, not just files |
| forbidOnly: !!process.env.CI | Fails the build if someone accidentally commits test.only() |
| retries: 2 (in CI) | Auto-retries failed tests to catch transient flakiness |
| workers: 2 (in CI) | Matches the 2-vCPU standard GitHub-hosted runner |
| reporter: 'blob' (in CI) | Produces mergeable reports for the sharding workflow |
| trace: 'on-first-retry' | Records a trace only when a test fails and is about to be retried, reducing storage |
| screenshot: 'only-on-failure' | Captures a screenshot at the moment of failure for debugging |
| video: 'retain-on-failure' | Records video but only keeps it for failed tests |
This configuration follows the patterns recommended in the Playwright automation checklist and works well for teams running Playwright CI/CD integrations across staging and production environments.

Source: Playwright official documentation on sharding
Note: Values based on a 200-test suite running on standard GitHub-hosted ubuntu-latest runners with 2 vCPUs each. Actual results vary by test complexity.
Conclusion
Running Playwright in GitHub Actions is not just about adding a YAML file to your repo. A production-grade setup involves making real decisions about browser caching, sharding strategy, report handling, secret management, and worker configuration.
Start simple. The basic workflow from the first section is enough for small projects. As your test suite grows beyond 50 tests, add caching to cut install times.
When runs start exceeding 10 minutes, introduce sharding. And when your team grows to the point where multiple engineers triage failures every morning, invest in a proper test reporting tool that surfaces trends without manual artifact downloads.
The key takeaway: treat your Playwright in GitHub Actions pipeline as a first-class part of your testing infrastructure. Version it, review it in PRs, and optimize it just like you would optimize the tests themselves.
FAQs

Pratik Patel
Founder & CEO